To connect WiFi to your Sanyo Smart TV, access the Settings menu and choose the Wireless option. Select your network and enter the password to establish the connection.
Sanyo’s Smart TVs offer a seamless viewing experience with access to various streaming services and apps. Connecting your TV to WiFi is essential to maximize its features and capabilities. By following a few simple steps, you can enjoy a wide range of entertainment options right from your Sanyo Smart TV.
In this guide, we will walk you through the process of connecting your Sanyo Smart TV to your WiFi network, ensuring you never miss out on your favorite shows and movies. Let’s dive into the easy-to-follow steps to get your Sanyo Smart TV connected to WiFi effortlessly.
Preparing For Connection
Before connecting your Sanyo Smart TV to WiFi, it’s essential to check its compatibility. Make sure the TV supports wireless network connections and has built-in WiFi capability. Additionally, ensure that your network is compatible with the TV’s requirements. Check for the appropriate network type and frequency compatibility to establish a smooth connection.
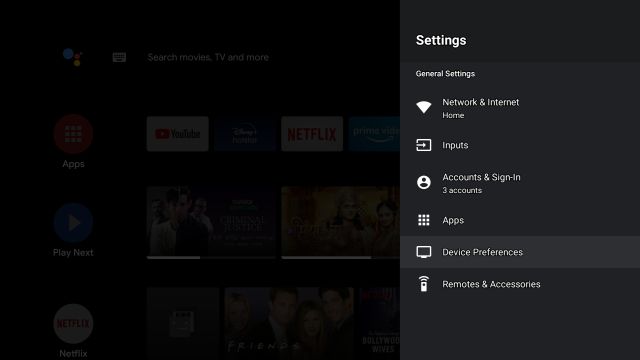
Credit: beebom.com
Connecting To Wi-fi
To connect your Sanyo Smart TV to Wi-Fi, follow these simple steps:
- Access TV settings:
- Selecting Wi-Fi Network:
- Entering Wi-Fi Password:
- Continue:
- Confirmation:
- Enjoy:
Using your remote, press the Menu button and navigate to the TV settings menu.
From the TV settings menu, locate the Network or Wi-Fi option and select it.
A list of available Wi-Fi networks will be displayed.
Use the remote to scroll through the list and highlight your desired network.
Once you have selected your Wi-Fi network, you will need to enter the password to connect.
Use the remote’s arrow keys to navigate to the password field and enter the password using the on-screen keyboard.
After entering the password, select the Connect or OK button to initiate the connection process.
Your Sanyo Smart TV will attempt to connect to the selected Wi-Fi network.
If the connection is successful, you will see a confirmation message on your TV screen.
Your Sanyo Smart TV is now connected to Wi-Fi, allowing you to stream content and access online services.
Troubleshooting
Having trouble connecting your Sanyo Smart TV to WiFi? Follow these simple troubleshooting steps for a seamless connection.
| 1. Check that the WiFi network is reachable in your home. | 2. Ensure your Sanyo TV is within range of the router. | 3. Restart the router by unplugging it for 30 seconds. |
| 4. Power off your Sanyo TV and unplug it for a few minutes. | 5. Update your Sanyo TV firmware to the latest version. |

Credit: www.walmart.com
Enhancing Connection
For a better connection:
Ensure Sanyo Smart TV is within reach of Wi-Fi signal. Using Wi-Fi extender, if needed, to boost signal strength. Optimizing router placement improves connection quality.

Credit: m.youtube.com
Conclusion
Connecting your Sanyo Smart TV to Wifi is essential for accessing a wide range of online streaming services and content. By following the simple steps outlined in this guide, you can ensure a seamless and hassle-free connection. With a stable internet connection, you’ll be able to enjoy the full potential of your Smart TV and enhance your entertainment experience.
Get ready to explore endless streaming options and stay connected to the digital world with your Sanyo Smart TV.