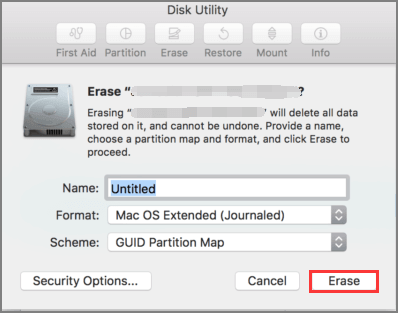
To reformat a Toshiba hard drive for Mac, connect the drive to your Mac, open Disk Utility, select the Toshiba drive, choose Erase, and set the format to “Mac OS Extended (Journaled).” Once the process is complete, the Toshiba hard drive will be reformatted and ready for use on your Mac.
If you’re a Mac user looking to reformat a Toshiba hard drive for use with your Mac, it’s a straightforward process that can be completed using Disk Utility. By following the simple steps outlined below, you can quickly reformat your Toshiba hard drive to ensure compatibility with your Mac system.
Read on to learn how to complete this task and get your Toshiba hard drive ready for use with your Mac.
Credit: www.youtube.com
Backup Your Data
To reformat your Toshiba hard drive for Mac, it is crucial to back up your data. One method is to use Time Machine, a built-in backup feature on your Mac. Time Machine automatically creates backups of your files, allowing you to restore them if needed. Another method is to manually back up your data by copying it to an external storage device or cloud storage service. When performing a manual backup, make sure to create multiple copies to minimize the risk of data loss. Remember to organize your files and folders for easier access during the reformatting process. After you have successfully reformatted your Toshiba hard drive for Mac, you can restore your backed-up data using Time Machine or manually copying it back to the hard drive. Take precautionary measures to protect your data and follow the necessary steps to ensure a successful reformat.
Credit: toolbox.easeus.com
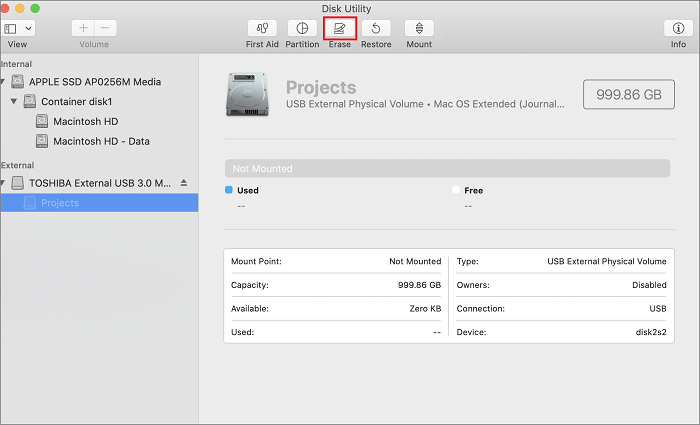
Preparing The Toshiba Hard Drive
Learn how to reformat your Toshiba Hard Drive for Mac with easy-to-follow steps. Prepare your hard drive for optimal performance and compatibility with your Mac system. Simply follow the instructions provided to format your Toshiba Hard Drive hassle-free.
| Preparing the Toshiba Hard Drive Check for Important Data before Reformatting. Look into Format Options for Mac to optimize the hard drive. |
Reformatting Process
To reformat a Toshiba hard drive for Mac, use Disk Utility on your computer. First, open Disk Utility and select the Toshiba drive. Next, choose the File System option. Finally, format the drive with the desired file system for Mac compatibility.
Credit: toolbox.easeus.com
Transfer Data Back To Toshiba Hard Drive
To transfer data back to your Toshiba hard drive after reformatting it for Mac, you can use different methods. One option is to restore your data from a Time Machine backup. This is a convenient way to retrieve all your files, settings, and applications as they were previously saved.
If you prefer manual data transfer methods, you can simply drag and drop or copy and paste files from your Mac to the Toshiba hard drive. This allows you to selectively choose which files to transfer and gives you more control over the process.
Another manual method is to use file synchronization software, which can help you synchronize files between your Mac and Toshiba hard drive. This ensures that both locations have the most up-to-date versions of your files.
If you have a large amount of data to transfer, you may want to consider using an external hard drive docking station or an external USB adapter. These devices enable you to connect your Toshiba hard drive directly to your Mac for a faster and more efficient transfer.
Remember to keep a backup of your important data before reformatting your Toshiba hard drive for Mac, as reformatting erases all existing data on the drive. This way, you can ensure that your files are protected and easily accessible in case of any unforeseen issues during the transfer process.
Testing The Reformatted Drive
It’s important to test the reformatted Toshiba hard drive for read/write compatibility on your Mac. Before proceeding with any further tasks, verify the integrity of your backup to ensure that all data has been safely and accurately transferred. This crucial step will help prevent any potential data loss and ensure that your reformatted drive is fully operational on your Mac.
Managing The Reformatted Drive On Mac
When reformatting a Toshiba hard drive for Mac, it’s crucial to follow specific steps in order to optimize performance and troubleshoot any potential issues. Ensure that the drive is compatible with Mac OS and format it to the appropriate file system. To optimize performance, consider enabling journaling and using Disk Utility to manage partitions and troubleshoot common issues such as unrecognized drives or data corruption. It’s essential to back up your data before reformatting and seek professional assistance if you encounter persistent problems.
Conclusion
Reformatting your Toshiba hard drive for Mac is a simple process that can help optimize your device’s compatibility and performance. By following the step-by-step instructions in this guide, you can easily format your drive and gain access to its full potential on your Mac.
Remember to always back up your important data before proceeding with any formatting tasks. With these tips, you’ll be able to seamlessly integrate your Toshiba hard drive into your Mac ecosystem and enjoy a smooth user experience.